Tag: windows

Only record audio from specific applications with NVIDIA ShadowPlay

ShadowPlay is a feature of modern NVIDIA graphics cards that allows for recording games and other applications at native resolution with only a minimal performance hit. It also includes some genuinely useful features like instant replay.

Unfortunately, the audio options for recording are pretty limited. By default, all audio is recorded to a single mixed track. This includes the game audio, but also your mic, notification sounds, any music you're playing in the background, people talking on Steam, Discord, etc.

After some experimentation I eventually found a way to pick which applications to record the audio from, but it's not intuitive at all so I'm documenting it here.

General idea

  • Create a virtual audio device
  • Play the audio from this device to the default audio device so you can hear it
  • Force the applications you want to record to only play audio to this device
  • Tell ShadowPlay to only record audio from this device

Step by step guide

  1. Install GeForce Experience and enable the in-game overlay and hotkey in the settings. Press the hotkey to bring up the overlay. In the overlay on the right you will see a microphone icon. Click it to bring up a dropdown menu then click on "Settings". In the menu that appears, configure your microphone input and select the "Separate both tracks" option. This will cause your microphone audio to be recorded, but in a separate track from the game audio, making it easy to strip out or mix in later. You can also just use the single track mode and mute the mic instead if you never want to record yourself.

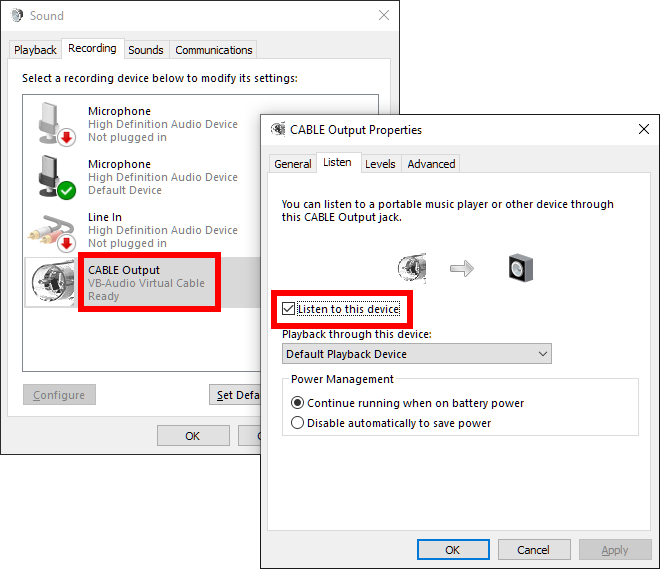
  2. Install Virtual Audio Cable. This will install two virtual sound devices on your system: "CABLE Input" (an output device) and "CABLE Output" (an input device). When sounds are played out the "CABLE Input" device, they can be recorded by listening to the "CABLE Output" device.

  3. Open the "Sounds" control panel (Open the Control Panel, click "Hardware and Sound", then "Sound"), go to the "Recording" tab and find the "CABLE Output" device. Double click it to open its properties. Go to the "Listen" tab, check the "Listen to this device" option, and select the "Default Playback Device" as the target. This will allow you to hear any audio that is played by this device. Configuring the "CABLE Output" device in the sounds control panel

  4. Launch all applications and games you want to record.

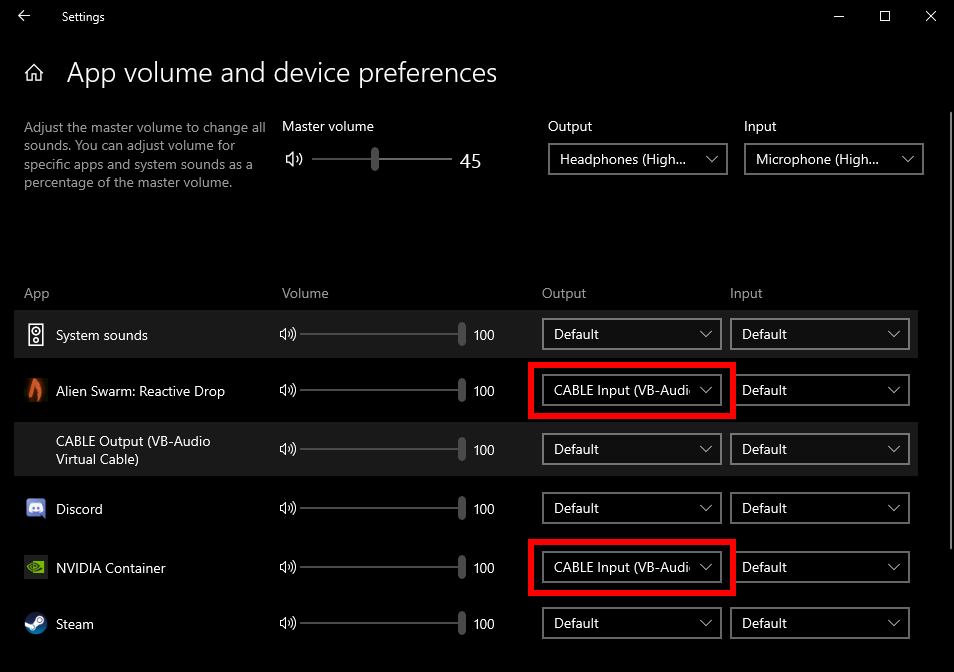
  5. Open the Sound mixer (Start menu, type "Sound mixer options"). You should see your open programs mapped to audio inputs and outputs. If you don't see a "NVIDIA Container" program listed then activate the GeForce overlay and toggle the "Instant Replay" setting on and off to make it appear. Change the "Output" of the "NVIDIA Container" application to the "CABLE Input" device. This tells ShadowPlay to only record the audio sent to this output.

  6. Change the "Output" of each of the applications you want to record to "CABLE Input". I'm recording the audio from a game called Alien Swarm: Reactive Drop in the example below. Recording the audio from Alien Swarm: Reactive Drop

  7. Start recording (or enable the instant replay recording mode)

The resulting video files will only include audio from the applications you selected in step 6. If you opted to record your microphone in step 1, it will be in a separate audio track that you can either remove or manually mix into the main audio later.

Notes

  • Tested on Windows 10 21H1 running GeForce Experience v3.22.0.32
  • Once this is all set up, the only thing you'll have to mess with on an ongoing basis is the mixer settings (steps 5 and 6)

Preventing auto-locking and sleeping by simulating user activity

This post will detail how to simulate activity on your computer in order to prevent it from auto-locking or going into sleep mode. Note that this will usually also prevent the "auto-away" functionality of various chat programs from ever marking you as "away".

Generally you should change your operating system's settings to disable sleeping and auto-locking if possible instead. These methods are for when you don't have the access or permission to change those settings (ie. locked-down devices).

Windows

This method runs a Powershell script on login that toggles scroll lock on/off every minute. Since scroll lock mostly doesn't do anything on modern systems and the script will press it twice to immediately unlock/relock it, this is basically unnoticeable to the user. However, if you have issues simply swap the two {SCROLLLOCK}s in the below command to something else. A full list of special keys can be found here.

  1. Open Explorer (shortcut: Win+E)
  2. Paste %APPDATA%\Microsoft\Windows\Start Menu\Programs\Startup into the location bar and hit enter to navigate there.
  3. Right click in the folder and click New > Shortcut to open the shortcut creation wizard.
  4. Paste the following as the shortcut's location:

    1
    powershell.exe -windowstyle hidden -command "$myshell=New-Object -com \"Wscript.Shell\";while(1){$myshell.SendKeys(\"{SCROLLLOCK}{SCROLLLOCK}\");Start-Sleep -Seconds 60}"
    
  5. Give it any name you like and hit Finish

macOS

This method runs a shell script on login that uses a tool called cliclick to move the mouse one pixel left and right every minute. This is such a small and fast movement that it's usually not noticeable unless you're really looking for it.

  1. Install cliclick from the project website or via brew (brew install cliclick)
  2. Create a script called jiggle with the following contents:
1
2
3
4
5
#!/bin/sh
while true; do
    cliclick 'm:-1,+0' 'm:+1,+0'
    sleep 60
done
  1. Make the script executable (chmod +x jiggle)
  2. Open System Preferences, search for "login items" and hit enter.
  3. Click the + button, select the jiggle script and hit "Add". You should see it appear in the list of programs as a "Unix executable". Check the "Hide" checkbox beside it and exit.

Xorg-based Linux

Much like the macOS version above, this moves the mouse one pixel left and right every minute. If you would prefer to instead use a keyboard-based method like the above Windows version, use xdotool key Scroll_Lock twice instead of the xdotool mousemove_relative * commands in the following script. More special key names for xdotool can be found here.

  1. Install xdotool (usually available via your package manager)
  2. Create a script called jiggle with the following contents:
1
2
3
4
5
6
#!/bin/sh
while true; do
    xdotool mousemove_relative --sync -- -1 0
    xdotool mousemove_relative 1 0
    sleep 60
done
  1. Make the script executable (chmod +x jiggle)
  2. Configure your OS to run the script at login. Usually this would be done through the desktop environment's settings or via something like systemd.

Wayland-based Linux

Some preliminary research suggests that this is possible on Wayland using ydotool as a replacement for xdotool. I don't currently run a Wayland-based setup so I can't test it. If you manage to find a solution for Wayland feel free to send it to me and I'll update the post.


Queen's University Resnet without IDA (Windows)

Storytime

So you're in your first year at Queen's University residence and you want to access the internet. Sounds reasonable. You plug in your Windows laptop, open your browser, and...nothing. Well, mostly nothing. A page that tells you that you've been quarantined and to please click here, download IDA, install it, and let it work it's magic.

Sounds easy right? What they don't tell you is that IDA holds ResNet access hostage until you've installed some garbage antivirus, downloaded all the new windows updates (IDA actually does this itself, it doesn't step back and let Windows Update do it's job), and a few other things. After all that, you enter your NetID and password, and it registers you. In theory.

What I ran into every single time I ran it with my laptop (running Windows XP at the time) was it failing to download something, throwing an error message and refusing to register me. I gave up after a few times and plugged in my other computer (Running the relatively obscure Windows XP x64). What I noticed is that I didn't get the typical quarantine page, I got a simple page that asked for a NetID and password. I entered my information and got a message stating I was good to go. I checked a few pages and they all seemed to work.

I plugged my laptop back in and tried to load a page. The same quarantine screen. Since the main way a webpage tells the difference between two operating systems is the user agent, I fired up Tamper Data and submitted a request with a blank one. I got the same page that asked for my NetID and password.

I assume this works because if the registration server decides (based on your user agent) that IDA won't run on your computer, instead of leaving you screwed, it'll give you an alternate way out. Since when you take away the user agent the server can't tell what kind of operating system you're running, they assume that IDA won't work on it and give you the simple "Enter your account details" prompt.

Register a computer without IDA

  1. Acquire unblocked internet (the queensu wireless is a good bet).
  2. Download and install Firefox and the Tamper Data addon.
  3. Disconnect from the internet and plug in to ResNet.
  4. In Firefox, click Tools, Tamper Data.
  5. In the window that pops up, click "Start Tamper".
  6. Try to load a website.
  7. A window will pop up asking you if you want to tamper with the request. Click the "Tamper" option.
  8. In the windows that pops up, delete everything in the "User-Agent" field and hit OK.
  9. Repeat steps 8 and 9 until the popups stop and the page loads.
  10. Click "Stop Tamper" and close the Tamper Data window.
  11. You should be on a page that tells you to enter your NetID and password, do so and hit OK.

Your computer should now be able to use ResNet normally.

Registering other devices

Your computer is registered via it's MAC address. This means that if you want to use ResNet with a device that can't run IDA, doesn't have a web browser, and is against IT policy *cough* wireless router *cough*, you can't. In theory.

The easy way of course, it to call up ITS and tell them your Xbox can't connect. They'll ask you for your Xbox's MAC address, you'll give them the router's MAC address, and they'll register it. Aside from lying to ITS being morally wrong, this works. However, I've heard complaints that devices registered via calling ITS have had their speed throttled. Throttling non-school-related devices on a school network makes sense, but I haven't seen any actual proof of this.

The better way of registering your other devices though, is to trick the registration server into thinking that your device is just a normal computer. Since computers are registered by their MAC addresses, you just need to register the MAC address of your device with the system.

The following steps will show you how to spoof your device's MAC address and register it from your computer.

  1. Find the MAC address of your device. It will probably be somewhere in the Advanced Options.
  2. Unplug your device from ResNet and plug in your computer.
  3. Open Control Panel, Network and Internet, Network Connections and note the name of your connection. Usually it's "Local Area Connection"
  4. Download and extract Macshift into a folder somewhere.
  5. Open a command prompt window in the Macshift folder.
  6. In the command prompt window type

    1
    macshift.exe -i "[connection name]" [device MAC address, no dashes]
    

    For example, if my device's MAC address was "00-11-22-33-44-55" and my connection name was "Local Area Connection", I would run

    1
    macshift.exe -i "Local Area Connection" 001122334455
    
  7. Wait until you have network access again and try to load a page. If everything went as planned, you should be seeing the ResNet quarantine page.

  8. Use the steps in the section above to register your computer again.
  9. Once you have ResNet access, go back to the command prompt and run

    1
    macshift.exe -i "[connection name]" -d
    

    This restores your MAC address back to it's original value.

Your device should now be able to use ResNet normally.

Disclaimer

All information above is provided for informational purposes only. I take no responsibility for the outcome of your actions. Furthermore, all information on IDA is based on experiences in 2009, It may have improved over time (ha).

© Carey Metcalfe. Built using Pelican. Theme is subtle by Carey Metcalfe. Based on svbhack by Giulio Fidente.